E-commerce stores have different email IDs for different purposes. For easy identification, having multiple email IDs is useful and easily manageable.
In the Magento 2 store, you can have up to five different email addresses to display different functions or distinct sections for each store. In this part of the Magento tutorial on the WeGento website, we will mention the steps to change email addresses in Magento 2.
Related posts: How to reset admin password in Magento 2
Magento 2 offers two custom identities and three predefined email identities that you can set as per your needs. Predefined email identities are:
- General Contact
- Sales Representative
- Customer Support
Each relevant address and e-mail address can be associated with automated and specific e-mail messages and appear as the sender of e-mail messages sent from the store. The contact form will be sent to different email addresses. Changing the email address in Magento is one of the most important tasks when starting an online store.
After changing the store email addresses, we recommend you install the SMTP extension for testing and make sure that the addresses you have entered are correct.
Steps to change Magento email address
To change your store email address, you can do the following:
- Set up email addresses for your domain.
- Configure the email addresses for your store.
- Update Sales Email configuration.
Step 1: To Change Magento Email Address, Set up email addresses for your domain:
In the first step, before setting up the email address for the store, each email must be set as a valid email address for your domain. Follow the instructions of your server or hosting provider to create any required email address.
Step 2: Set up your store’s email addresses:
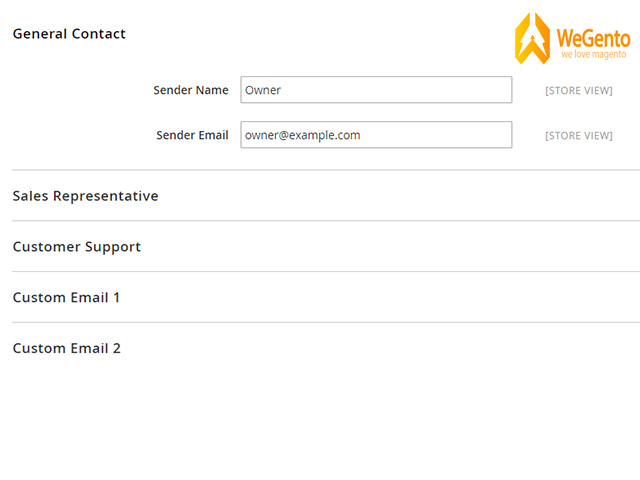
In this step, you can create the email addresses for General Contact, Sales Representative, and Customer Support.
- Log in to your Magento Admin Panel.
- Navigate to Stores> Settings> Configuration.
- On the left sidebar, under General, select Store Email Addresses.
- Expand the General Contact section and do the following:

- Type the person’s name to be displayed as the Sender’s Name in the sender of each email for your customers.
- In the Sender Email field, type the relevant email address.
- Repeat this process for each store email address you intend to use.
- When done, click Save Config.
Step 3: Update your sales email settings:
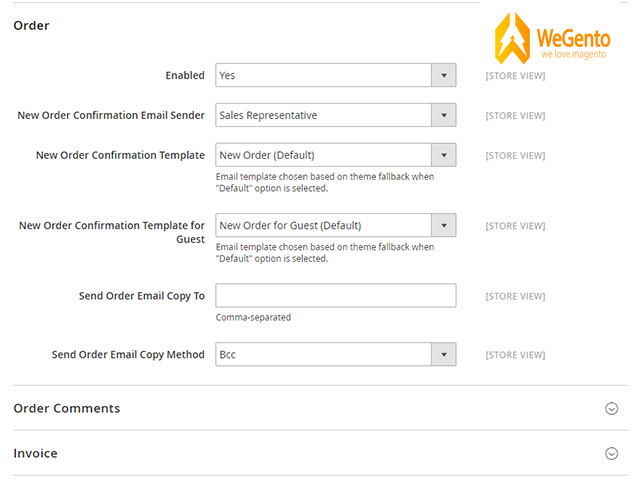
If you are using custom email addresses, make sure that you update the configuration of each email message so that the correct identity appears as the sender.
In the left panel, select Sales Emails from the Sales section. This page has a separate section for each of the following:
- Order and order Comments
- Invoice and invoice Comments
- Shipment and Shipment Comments
- Credit notes and credit note Comments
- Start with the Order section and open the section for each message and make sure the sender is selected correctly.
- Once it’s done, click Save Config.

To conclude
To have a successful eCommerce store, you need a team effort, so don’t set all the emails to be sent to one account. Configuring the email address for store representatives helps the store team manage and quickly process the different requests. We discussed the Steps to Change Email Addresses in Magento 2, and we hope it has been useful. If you have any questions or problems, share them in the comments.


